Dissolve Shader
A dissolve shader returns a cool effect and it’s easy to make and understand; today we’ll create our one in Unity’s Shader Graph and also write it in HLSL.
Here’s an example of what we’ll create:
How it works
To create a dissolve shader you have to play with the AlphaClipThreshold value in a “Shader Graph” shader or use the HLSL function called clip.
Basically you tell the shader to not render that pixel, based on a texture and a value that you give.
What you need to know is: the white parts dissolve sooner.
The texture that we’ll use is this one:
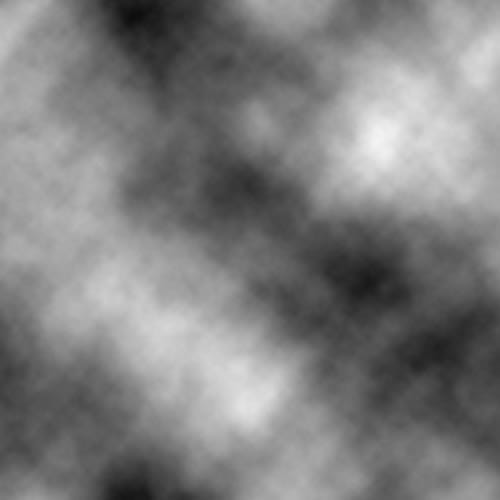
You can create your own too! Lines, triangles, whatever you want! Just keep in mind the “white parts dissolve sooner“.
I created this in Photoshop, using the filter “Clouds”.
If you’re only interested in the Shader Graph one and don’t know about HLSL I suggest to read that part too, since it’s useful to understand how Unity’s Shader Graph works under the hood.
Creating the Shader
HLSL
In HLSL we use the function clip(x). The clip(x) function discards any pixel with a value less than zero. So, if you call clip(-1) you’re sure that your shader will never render that pixel. You can read about clip in the Microsoft Documentation.
Properties
Our shader needs two properties, the Dissolve Texture and the Amount (which represents our overall progress). As all properties and variables, you can call them however you want.
Properties {
    //Your other properties
    //[...]

    //Your Dissolve Shader properties
    _DissolveTexture("Dissolve Texture", 2D) = "white" {}
    _Amount("Amount", Range(0,1)) = 0
}
Remember to add this after your SubShader’s CGPROGRAM (in other words: declare the variables):
sampler2D _DissolveTexture;
half _Amount
Also, remember that their name must match the ones in the Properties section.
Function
We start our Surface or Fragment function sampling our dissolve texture and getting the red value.
In this example I’m using a surface shader:
void surf (Input IN, inout SurfaceOutputStandard o) {

    half dissolve_value = tex2D(_DissolveTexture, IN.uv_MainTex).r; //Get how much we have to dissolve based on our dissolve texture
    clip(dissolve_value - _Amount); //Dissolve!

    //Your shader body, you can set the Albedo etc.
    //[...]
}
P.s. Our texture is a grayscale, this means that R G and B are equal and you can pick what you prefer. For instance, white is (1,1,1), black is (0,0,0).
That’s it! You can apply this process on each shader you have and turn it into a dissolve shader !
Here’s Unity’s default Surface Shader turned into a double-sided dissolve shader:
Shader "Custom/DissolveSurface" {
	Properties {
		_Color ("Color", Color) = (1,1,1,1)
		_MainTex ("Albedo (RGB)", 2D) = "white" {}
		_Glossiness ("Smoothness", Range(0,1)) = 0.5
		_Metallic ("Metallic", Range(0,1)) = 0.0

		//Dissolve properties
		_DissolveTexture("Dissolve Texutre", 2D) = "white" {}
		_Amount("Amount", Range(0,1)) = 0
	}

	SubShader {
		Tags { "RenderType"="Opaque" }
		LOD 200
		Cull Off //Fast way to turn your material double-sided

		CGPROGRAM
		#pragma surface surf Standard fullforwardshadows

		#pragma target 3.0

		sampler2D _MainTex;

		struct Input {
			float2 uv_MainTex;
		};

		half _Glossiness;
		half _Metallic;
		fixed4 _Color;

		//Dissolve properties
		sampler2D _DissolveTexture;
		half _Amount;

		void surf (Input IN, inout SurfaceOutputStandard o) {

			//Dissolve function
			half dissolve_value = tex2D(_DissolveTexture, IN.uv_MainTex).r;
			clip(dissolve_value - _Amount);

			//Basic shader function
			fixed4 c = tex2D (_MainTex, IN.uv_MainTex) * _Color;

			o.Albedo = c.rgb;
			o.Metallic = _Metallic;
			o.Smoothness = _Glossiness;
			o.Alpha = c.a;
		}
		ENDCG
	}
	FallBack "Diffuse"
}
Shader Graph
If we want to create this effect using Unity’s Shader Graph, we have to play with the value AlphaClipThreshold (which doesn’t work like HLSL’s clip(x)). In this example I created a PBR shader.
AlphaClipThreshold tells your shader to discard any pixel that has its Alpha value lower. For example, if it’s 0.3f and your alpha is 0.2f your shader won’t render that pixel.
You can read about AlphaClipThreshold‘s function in unity‘s documentation too: PBR Master Node and Unlit Master Node.
This is the final shader:
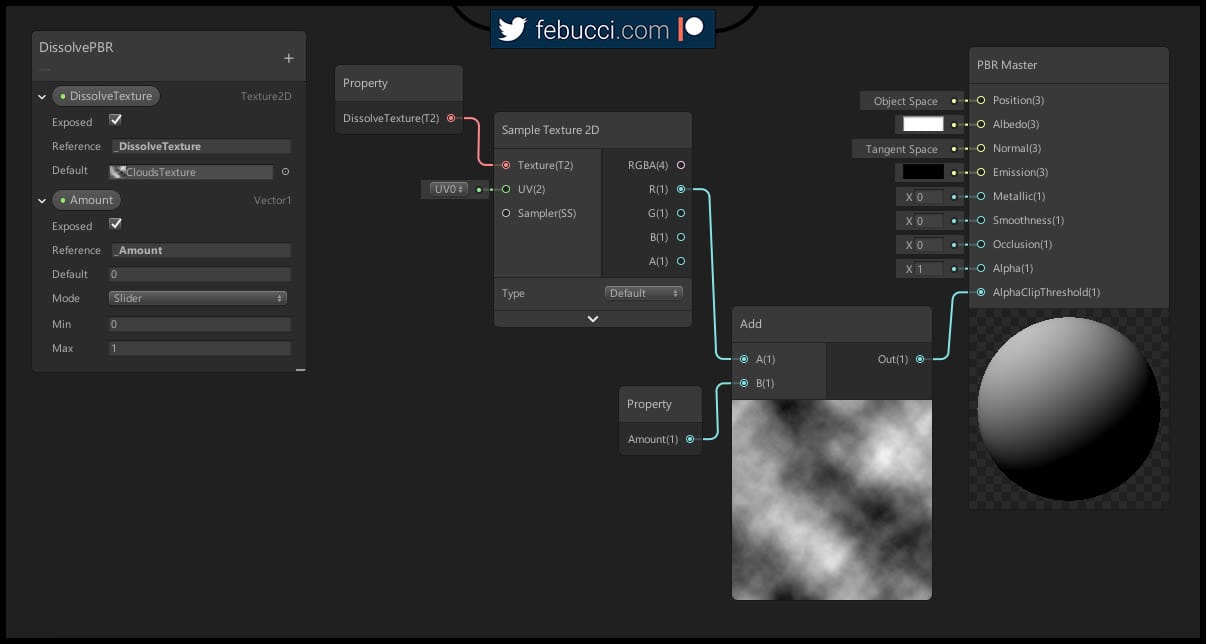
We sample our dissolve texture and get the red value, then add it to our Amount value (which is a property I created that represents the overall progress, 1=full dissolve) and connect it to the AlphaClipThreshold.
If you want to apply it on any other shader you already have, just copy the nodes connection on the AlphaClipThreshold (don’t miss the required properties!).
You can also make it double-sided and get an even better result!
Dissolve Shader with Outlines
What if we want to give it a different feeling adding outlines?
WWe can’t work on “already dissolved pixels” because once they’re discarded… they’re gone forever. We can work on “almost dissolved” values instead!
In HLSL it’s really simple, we have to add a few lines of code after our clip calculations:
void surf (Input IN, inout SurfaceOutputStandard o) {
    //[...]
    //After our clip calculations
    o.Emission = fixed3(1, 1, 1) * step( dissolve_value - _Amount, 0.05f); //emits white color with 0.05 border size

    //Your shader body, you can set the Albedo etc.
    //[...]
}
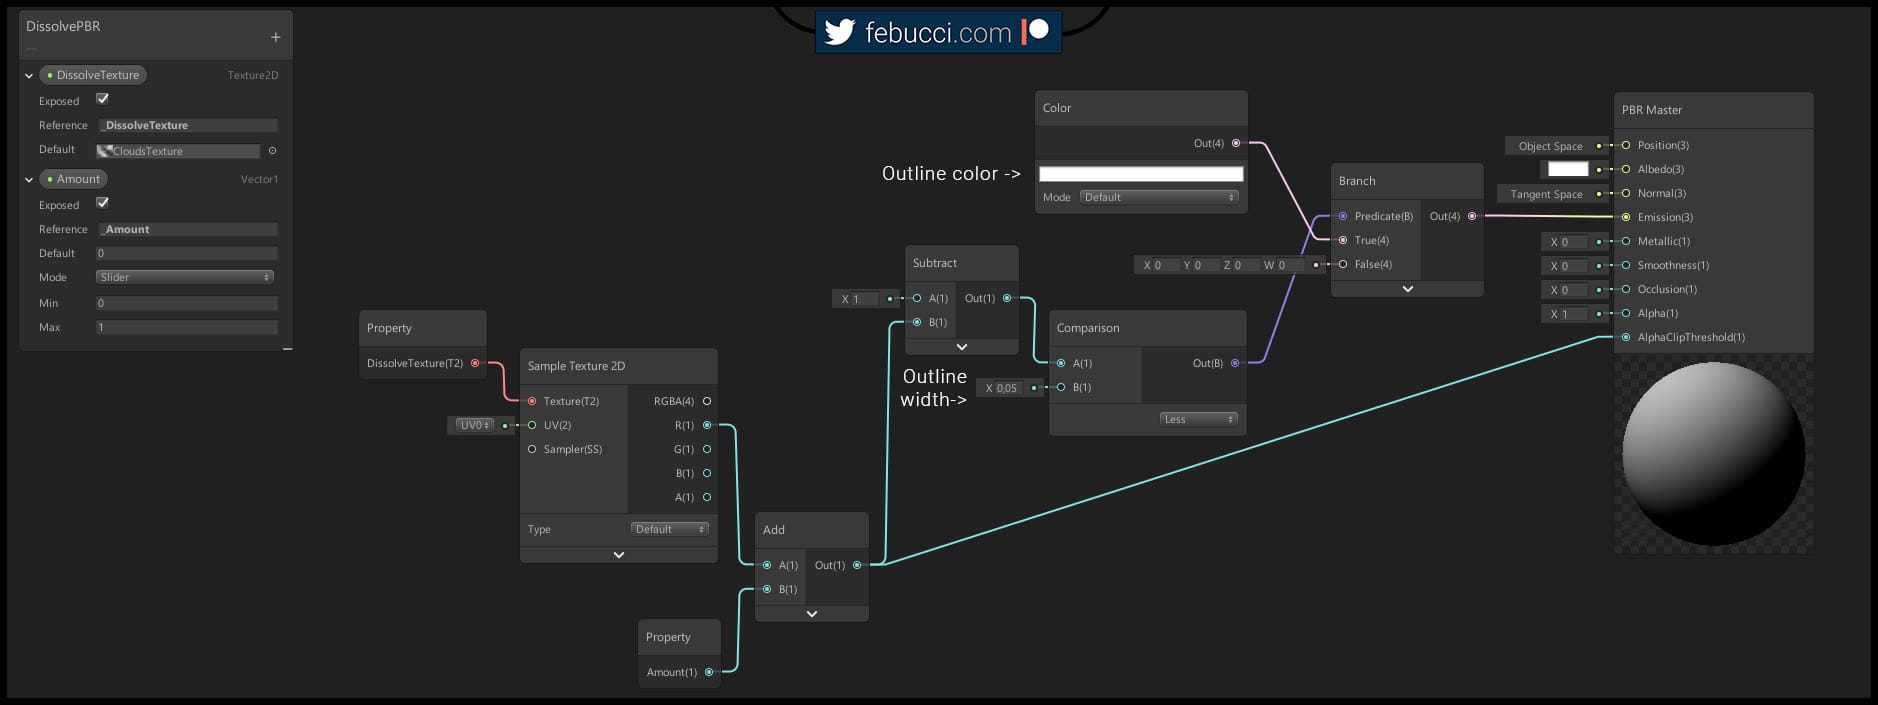
Using Shader Graph the logic is a bit different, here’s the final shader:
Read part two: World Reveal Shader.








Comments