
Tired of writing boilerplate EditorPlugin code just to customize the Godot inspector in C#? We built a free addon that auto-registers your custom inspectors and attribute drawers, so you can focus on the actual editor UI instead of the plumbing. Here's how it works and how to set it up.
How do I create custom inspectors in Godot using C#?
We found ourselves a bit frustrated (and surprised) when discovering how much it takes hooking up custom inspectors or drawers in Godot, at least in C# (where you have to also recompile everything). So we fixed it. And it's publicly available on GitHub!
What's the deal
The issue
The Godot way of doing things forces you to create a plugin anytime you want to customize the Editor, since letting it know that a custom inspector, dock or drawer exists is only available through methods of the EditorPlugin class. That single class is the only official registration point for all custom editor extensions in Godot 4.
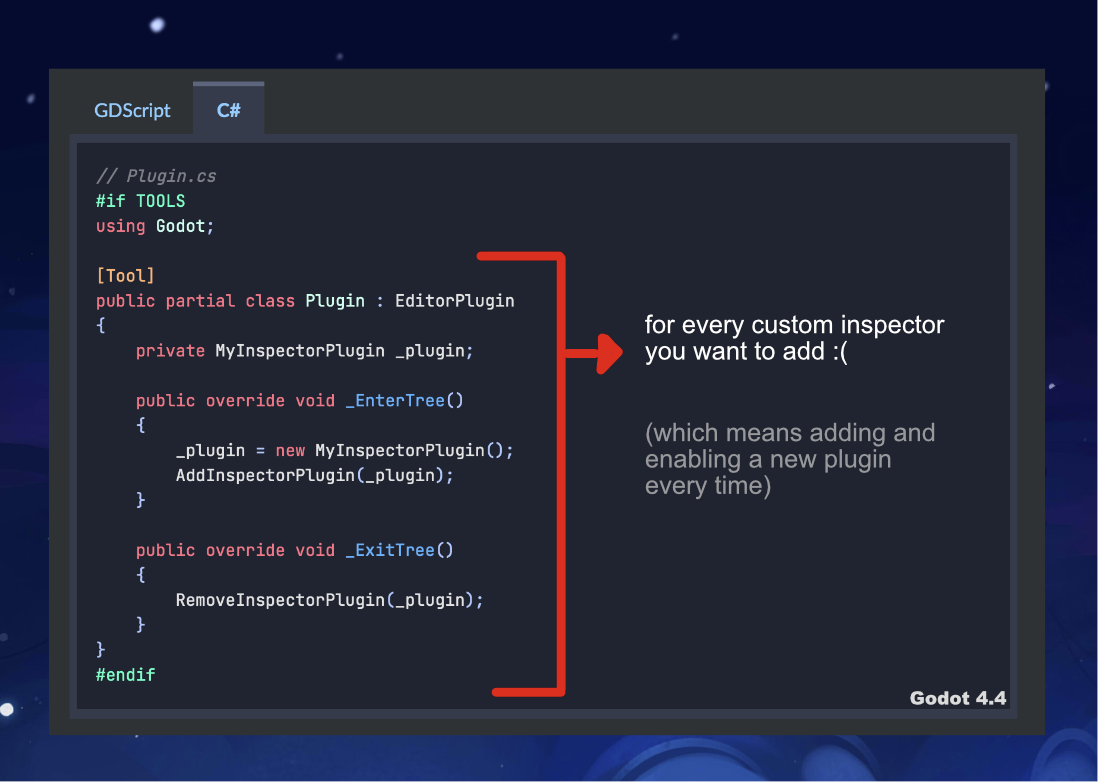
It is a tedious process that forces you to either create a custom EditorPlugin for each "group" of classes that work together (so that if one breaks, other groups are still intact in the editor), or have one big giant class where you have to manually add all your custom inspectors etc. one after another. In a medium-sized project you could easily end up with 10+ manual registrations in a single file, making it a chore to maintain. The EditorInspectorPlugin API reference covers the base class you'd normally implement, but the registration boilerplate around it is what gets painful.
The solution
No more endless wrappers! You can now inherit from specific classes (like "CustomInspectorBase") and our addon will take care of scanning them automatically and customize the editor accordingly.
One plugin that automatically detects Inspectors and lets Godot know about it. No extra dependencies (simply delete the Inspector class and it's removed from anywhere, or create it and it's added automatically).
Installing the plugin
To download and install the plugin:
- Clone our repository (or just download the zip files)
- Copy the
addonsfolder directly into your Godot project. - ⚠️ Remember to build your project (or Godot still wouldn't be able to know about the addon)
- Enable the plugin in
Project -> Project Settings -> Plugins -> Editor Utils.
Hooking up your first custom inspector
Attributes
After this.. you're set! As an example, let's say we want a "ReadOnly" attribute that shows the value in the Editor, but is not modifiable.
We can declare it in a Node like this:
public class ReadOnlyAttribute : Attribute{ }

[Tool]
public partial class ExampleNode : Node
{
    [Export] int thisIsAnInt;
    [Export] bool thisIsABoolean;
    [Export, ReadOnly] float thisIsAFloat;
}
And the actual implementation becomes:
using System;
using Godot;
using Febucci.EditorUtils;

#if TOOLS
public partial class ReadOnlyDrawer : AttributeDrawerBase<ReadOnlyAttribute>
{
    protected override Control GetPropertyEditor(Variant.Type type, string name, PropertyHint hintType, string hintString, PropertyUsageFlags usageFlags, bool wide, object value)
    {
        return new Label() { Text = $"{name}: {value.ToString() ?? "null"}" };
    }
}
#endif
Node inspectors
You can go further and modify the entire inspector of a Node. The process is similar: inherit from "CustomInspectorBase<YOURNODE>" and you can start customizing the Inspector right away. This is useful for things like organizing properties into groups, adding custom buttons, or hiding fields based on other values, all without touching the node's source code. If your inspectors need to react to node changes, pairing this with a solid signals architecture will keep things clean.
Frequently asked questions
Does this addon work with GDScript?
Not yet - it currently requires C#. GDScript support would likely need a C++ extension to scan classes at edit time.
Do I need to rebuild the project every time I add a new inspector?
Yes, once when you first add the class. After that the addon detects it automatically without extra registration steps.
Is this compatible with Godot 4.x?
It was written and tested on Godot 4.4. Older or newer 4.x versions should work but are not officially tested yet.
Can I use this in a commercial project?
Yes, it is MIT licensed, so there are no restrictions on commercial use.
In conclusion
Have fun! The system can be expanded with more hooks and similar (for example auto-adding scenes to the Inspector Dock) so we'll keep you updated once we're able to do so. You find everything in the repository. It's MIT licensed, meaning 0 restrictions on commercial use, and works on Godot 4.4 (tested).
If you're building UI in Godot, you might also want to check our Godot UI tutorial and our post on dynamically scaling font sizes.
Thank you so much for reading and see you on the next post!

Federico is the founder and original "Febucci", developing games since 2016 and helping others do the same. Started as a solo developer and built a team around Text Animator making tools, games and traveling to events with talks and more.

Sincere posts about game development
We have been making games for more than 10 years and we want to share with you everything we have learned along this journey, from game engine tutorials to the way we see things in general, including heartfelt rants and exciting wins. If you find what we do valuable, please consider joining the newsletter!
- Exclusive insights sent via email only
- Read extra content when logged in
- Join a friendly and sincere community
- Help us stay independent from algorithms


Comments